


SELECT ONE OF THE FOLLOWING CATEGORIES
(Models, finishes, product code identification)
Floor drain identification code 100
Roof or Terrace drains, identification code 200
Floor drains can be installed in both internal and external areas. The pipe diameter required for the drainage area is determined by the mechanical engineer’s calculations. Carmiol drains have a collection strainer area greater than or equal to the discharge area, respecting the engineer’s design for proper water removal rate. It is recommended for exterior applications, the open area of the grate to be double the size of its discharge. Drain location and quantity are determined according to the discharge volume, area layout and location of surrounding structures and equipment.
Answer the following questions to choose the appropriate drain.
1. What is the diameter of the pipe at the installation of the drain?
Specifications of standard pipe diameters for drains can be found on the data-sheet of each product.
2. Do you prefer bronze or aluminum?
Both are high quality and anticorrosive. Aluminum is more economical while bronze offers greater mechanical resistance. In some specific cases, cast iron drain/grates are manufactured by request for heavy duty resistance.
3. Which type of fittings are preferred between the pipe and drain?
Embedded (E) (best seller), external thread, or internal thread? If the discharge pipe has a ‘male’ end attachment, then an internal thread drain should be chosen. If the attachment end is ‘female’, chose drains with an external thread. In cases where there is no pipe fitting or attachment, embedded fittings should be selected.
4. Which metal finish do you prefer?
(Non-slip, Satin, Enamel, Polished)
A. Non-Slip (Ad):
Economically priced and recommended for large surface areas exposed to pedestrian or vehicular traffic. Its rough surface and textured finish helps prevent accidents caused by slipping and sliding.

B. Satin (S):
Our most popular finish by request. Discrete, subtle and easily matches with any floor design.

C. Enamel (Es):
Utilized in places with strict attention to hygiene.
The smooth surface and finish reduces health risks by minimizing the accumulation of dangerous bacteria and microorganisms.
D. Polished (P):
This finish presents an attractive focal point on the floor, adding elegance to the installation area.

5. Which shape do you prefer your drain, round or square?
Many prefer square drains due to the facility to cut at right angles instead of circular cutting when installing in ceramic or tiled floors. Square drains are better suited for floors with linear designs. Round drains are also more cost effective.
6. Is the drain to be installed in places with strict hygiene regulations such as hospitals, laboratories or where food is prepared?
Indirect drains are recommended for sinks where food is washed and the discharge is not directly connected to the pipeline, but has a hose or pipe that is placed inside to allow drainage while in use. This prevents any microbes or contamination in the pipes from reaching food in the washing process. We also offer the option of enamel finish for a smoother surface and more sterile drainage. Examples of these features are drains CI-130, CI-131, CI-140, CI-141 and CI-147.

7. Do you have problems with odors and / or cockroaches coming from pipes or want to prevent these problems from occurring in the future?
We have drain designs that offer a hydraulic seal siphon which eliminates the passage of outside insects and odors from entering into the areas where the drain is installed. Examples CI- 132 , CI- 133 , CI- 134 , CI- 135 , CI- 143 and CI- 148
8. What type of traffic will the drain receive?
Pedestrian or vehicular? Drains designed for pedestrian traffic are models CI- 101 to the CI -129. The following models indicate drains designed to withstand vehicular traffic, CI- 137, CI- 140, CI- 142, CI- 149, CI- 152 and CI- 153.
9. Is your drain installation located on the ground floor, second story or mezzanine located above other floors?
Installation of a waterproof membrane layer such as asphalt or plastic is highly advised to prevent moisture from seeping through drain installations above the ground floor level. For these applications the drains are installed with a lower plate such as the CI- 144, CI- 145, CI- 146, CI- 150 and CI -151. The lower plate collects and discharges any water or moisture in between the drain and floor preventing any cause for leaking onto the downstairs ceiling.

10. Do you need an outdoor or garden drain?
We offer the CI-138 and CI-139. The dome ensures continual drainage even when the drain appears to be covered with leaves or trash. The drain’s screen is designed to prevent soil and rocks from going through the pipe.
11. Do you need a roof drain?
All 200 series drains have the necessary features for roof installations. The domes ensure that the drainage action continues even when leaves or debris accumulate at the base of the drainage. Selecting the correct model and drain will depend on the diameter of the pipe and amount of water to be evacuated. If your drain pipe is located in a corner or on the edge of the roof you can use any of our scupper drain (from CI- 211 to CI- 215) . In order to avoid water filtration problems on the floor below the roof, a waterproof membrane and drainage plate must be installed as used with models CI- 208 , CI -209 and CI- 210 .
Cleanouts are placed in strategic locations in order to gain access to the pipes for maintenance or to remove any obstruction preventing the passage of water. Additionally they are used to access, spigots, valves, gauges, hydrometers, etc. that are kept hidden. Cleanouts are also used to access storage tanks.
The diameter of the serving pipe will determine the size of the cleanout needed. Data for pipe diameter for all cleanout models is found in the first column of the technical information sheet.
If you are looking for something more economical, the CI-300 is the best-selling option. Its square shape is well suited to floors with rectilinear designs like most ceramics, marble, mosaics, etc. The CI-301 cleanout has a thread that allows the height of the cover to be adjusted and installed flush to floor level. It also comes with a PVC sanitation cap, which saves having to buy this accessory separately. This easy removable cap serves as a seal to prevent the passage of odors and insects and is easily installed using PVC pipe glue.
The round cleanout CI-302 has a lining that helps keep the area clean. The CI-303 is recommended when there are other floors below the location of the drain cover installation. The lower plate filters and traps any water that may get between the junction of the cap and the floor and leads out through discharge pipe avoiding moisture problems in the lower floor ceiling. In places with sporadic hosing down and washing, the installation registry CI-304 performs very well.
This cleanout works by removing the cover and the grate serves as a filter when heavy washing occurs.
Once everything is put in place, the cover prevents insects and odors from entering. For pipe diameters equal to or greater than 200 mm (8 “) we offer the CI-305. These caps may also be used in places where larger areas of access are needed such as tanks.
Aluminum rollers CI-400 are used to manufacture pipe supports needed where some type of expansion or movement occurs due to vibrations or thermal changes. One example is steam pipes. The only criteria to be considered is the diameter of the pipe. Pipe rollers supports are manufactured for various pipe diameters from 50 mm (2″) to 250 mm (10″). The diameter of the isolation needs to be considered when determining the pipe diameter. (See spec sheet here)
The type of grease interceptor needed will depend on the pipe diameter, maintenance requirements, waste water volume and available installation space. The larger the capacity of the trap the lower frequency of overall cleaning. The grease interceptor data sheets contain the information to help choose which best suit your needs. Be sure to note the diameter of the outlet pipe from the sink. The volumetric flow can also be determined by calculating the volume of water evacuation per minute. Just multiply the height x width x length in cm of the sink, the answer will correspond to the evacuation volume in cm3. Divide the result by 1000 to get the volume in liters. If you have 2 sinks connected to a single trap, you must add the total volume of both receptacles. The volume in liters divided into 1 minute provides the volumetric flow (L / min). The data sheet provides the recommendations for different volumetric flows. In reference to a house with a maximum of 5 residents, grease interceptor A is the best recommendation. For cafeterias and small restaurants we offer grease interceptor B. The larger sized grease interceptors are used mainly in food processing plants, condominium buildings and / or places where the diameter of the discharge tube is 3″ or 4”.
How to Determine a Product Code?
Once you have chosen the suitable drain, it’s important to specify the product code correctly. This is done as follows :
Product Code – diameter pipe to feed – type of connection chosen – chosen material – desired finish – upper drain (if applicable) – type of grate (when applicable)
Example 1

This information indicates the selection of the CI-145 drain for a 2” pipe, with embedded connection, aluminum lower plate and bronze upper drain with satin finish and C-121 (Grand Brilego) upper drain.
Example 2

This information indicates the selection of the CI-141 drain for a 4” pipe, with embedded connection, aluminum body and grate, enameled finish with ¾ (75%) grate and ¼ (25%) open corner.
Embedded drains
1. Protect the exposed surface of the drain with adhesive tape that won’t leave a residue.
2. Cut the PVC pipe as necessary so that the drain remains 1mm below surface level.
3. Cut the ceramic tile, marble, concrete, porcelain tiles, or any types of flooring materials 3-4 mm larger than the dimension of the drain. The floor cut out should be consistent with the shape and model of the drain, either circular, square or rectangular.
4. Clean the drain fitting and the pipe interior.
5. Apply polyurethane sealant or caulking around the drain fitting and insert it into the PVC pipe.
6. Check to make sure the drain remains approximately 1 mm below surface level.
7. Let the polyurethane sealant cure for the time indicated by the manufacturer.
8. Grout or cement around the drain to secure in position.
9. After the sealing grout has dried, the protective adhesive should be removed moments before handing over the finalized project to the client.
Threaded drains
Internally threaded drains are connected to a PVC male coupling while externally threaded drains are connected to a female coupling. It is recommended to attach the drain to the coupling first and then connect the PVC pipe as follow:
1. Protect the exposed surface of the drain with adhesive tape that won’t leave a residue.
2. Cut the PVC pipe as necessary so that the drain remains 1mm below surface level.
3. Cut the ceramic tile, marble, concrete, porcelain tiles, or any types of flooring materials 3-4 mm larger than the dimension of the drain. The cut-out can be circular, square, or rectangular according to the shape of the drain.
4. Thoroughly clean the threads on both the drain and the PVC coupling
5. Apply Teflon tape to the drain threads
6. Screw the drain into the PVC pipe and tighten. Do not over tighten as it could crack the couplings.
7. Connect the drain with the coupling to the PVC pipe using PVC glue. Make sure the ends are clean before gluing.
8. Seal around the drain with grout or cement to keep it in place, slightly below surface level
9. After the sealing grout has dried, the protective adhesive should be removed moments before handing over the finalized project to the client
CI-300, CI-302 y CI-305
1. Protect the exposed surface of the cleanout with adhesive tape that won’t leave residue
2. Cut the ceramic tiles, marble, concrete, porcelain tiles or any types of flooring materials 3-4mm larger than the size of the cleanout. The cut-out will be either circular or square according to the model of the cleanout
3. It is recommended that the pipe or PVC cleanout access is 5 cm below the floor level
4. Place the cleanout in the opening done in step 2. Make sure it is level with the ground. Grout or cement around the cleanout.
5. Remove the adhesive tape once the grout has dried and the project is ready to b turned over to the customer.
CI-303 y CI-304
To install cleanouts CI-303 and CI-304, follow the same instructions used for the installation of drains.
CI-301
1. Protect the exposed surface of the cleanout with residue-free adhesive tape
2. Cut the ceramic tiles, marble, concrete, porcelain tiles or any type of flooring materials 3-4 mm larger than the size of cleanout.
3. Thoroughly clean the outside of the PVC pipe and the inside of the PVC coupling of the cleanout
4. Apply PVC glue to the outside of the PVC pipe and the inside of the coupling and insert the PVC pipe into the coupling
5. Tighten or loosen the cleanout by screwing the cover to adjust its height to be flush with the floor
6. Seal around the cleanout with Grout or cement
7. After the grout has dried, the protective adhesive should be removed moments before handing over the finalized project to the client.
1. Proteja la superficie expuesta de la trampa con cinta adhesiva que no deja residuos.
2. Se aconseja instalar ventilaciones en las tuberías tanto de entrada como de salida de la trampa de grasa.
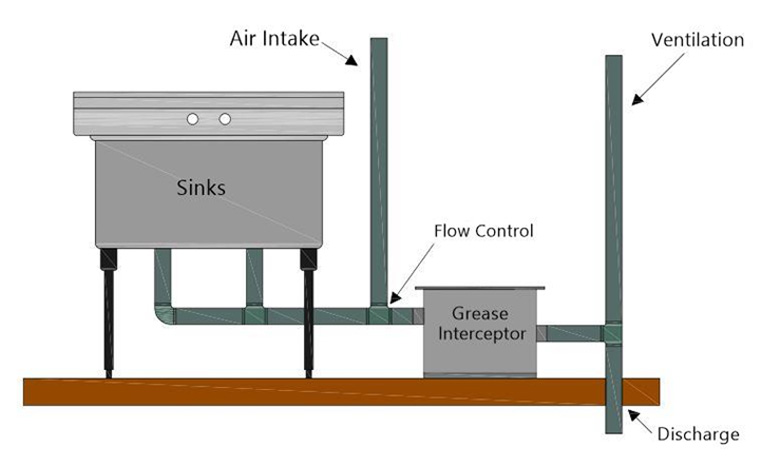
3. The grease trap should be installed as close as possible to the source of the liquid waste discharge.
4. Clean the outside of the PVC pipe used to connect the trap as well as inlet and outlet couplings.
5 .Use PVC glue to adhere pipes.
6. Fill in the spaces with cement or grout the installed trap is recessed in the floor).
7. After the sealing grout has dried, the protective adhesive should be removed moments before handing over the finalized project to the client.